How to Create an SRT File
Create your own SRT files [Free Template]
An SRT (.srt) file is one of the most common file formats for subtitling and/or captioning. ‘SRT’ stands for ‘SubRip Subtitle’ file. This format originated from the DVD-ripping software by the same name. SubRip would “rip” (or extract) subtitles and timings from live video, recorded video, and, of course, DVDs. Today, this format is widely supported by most media players and video software, and you can even create SRT files yourself.
SRT files offer a straightforward way to add captions to your videos. However, getting started can feel overwhelming. As industry leaders in captioning solutions, we’ve created a comprehensive guide to give you the lowdown on everything you need to know about SRT files – what they are, how to create them (on Mac and Windows), and why you should use them.
FREE Template: Create an SRT Files 📲
What is an SRT file?
As we mentioned, SRT files are derived from the SubRip software. This software extracted subtitles and their timing information from video content as a text file. Today, creating an SRT text file is easy to do without needing special software, and we’ll show you how! But first, it’s helpful to understand how SRT files are formatted and the components they’re made up of.
The Anatomy of an SRT File
There are many types of caption formats, but SRT files are very simple. This makes them easy for people to read and even edit using a basic text editor. Each caption frame within an SRT file follows the same structure.
This simple structure allows web players to synchronize the text with the video playback accurately. While some advanced formatting like italics or positioning might be supported by certain video players, the core strength of SRT lies in its universal compatibility and readability.

SRT File Components:
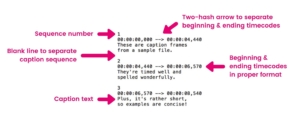
Each SRT file is built using these four key elements:
- Number of the caption frame in sequence
- Beginning & ending timecodes for when caption frame should appear
- The caption itself
- Blank line indicating the start of new caption sequence
Timecodes in SRT files follow this format: hours:minutes:seconds,milliseconds. The milliseconds are always shown with three decimal places. The start and end timecodes for each subtitle are separated by a double arrow (written as: – ->). After the timecodes and the subtitle text, you need to add a blank line to signal the start of the next subtitle. When you save your SRT file, make sure to use the .srt extension.
Why are SRT files so popular?
SRT files are widely used because they provide the following benefits:
- Wide Compatibility: SRT files work seamlessly with a vast range of media players, video hosting platforms, lecture capture software, and video editing tools.
- Human-Readable: Their plain text format makes them easy to understand, edit, and troubleshoot.
- Language Support: SRT files can accommodate characters from almost any language.
- Versatility: They can be used for both closed captions (including sound descriptions and other non-speech elements) and subtitles (primarily dialogue).
3Play Media includes seamless SRT captioning integrations with many popular platforms used for online video, including Facebook, YouTube, and Wistia.
FREE Template: Create an SRT Files 📲
How to create SRT files:
The first step in creating an SRT file is to create the transcript for your video – depending on the operating system you’re using, the instructions may vary. Don’t worry, we’ve got you covered:
For Mac users
- Open a new file in TextEdit
- To begin, type the number 1 to indicate the beginning of the first caption sequence. To move on, press enter
- Enter the beginning and ending timecode, using the following format: hours:minutes:seconds,milliseconds – -> hours:minutes:seconds,milliseconds
- When you’re finished, press enter
- In the next line, begin typing your captions. It is best practice to limit captions to 32 characters, with 2 lines per caption – this ensures viewers aren’t forced to read too much too quickly, and that captions don’t take up too much space on the screen. Additionally ensure your captions comply with legal guidelines.*
- After the last line of text in the sequence, press enter twice. Always leave a blank line to indicate a new caption sequence
- After the blank line, type the number 2 to indicate the beginning of the second caption sequence and type your captions following SRT format.
- Repeat these steps until you have a completed transcript!
- To save your file as an .srt, click Format → Make Plain Text, or you can use the keyboard shortcut Shift + Command + T
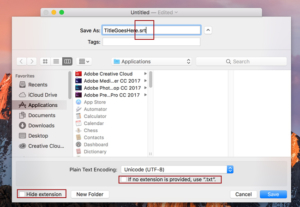
- Then click File → Save. Under Save As, type the name of your file. Then, change the file extension from .txt to .srt
- Uncheck Hide Extension on the bottom left-hand side of the menu, as well as If no extension is provided, use “.txt”
- Click Save. Congratulations – you are now ready to upload your captions!
For Windows users
- Open a new file in Notepad
- To begin, type the number 1 to indicate the beginning of the first caption sequence. To move on, press enter
- Enter the beginning and ending timecode, using the following format: hours:minutes:seconds,milliseconds –> hours:minutes:seconds,milliseconds
- When you’re finished, press enter
- In the next line, begin typing your captions. Best practices recommend limiting captions to 32 characters, with 2 lines per caption – this ensures viewers aren’t forced to read too much too quickly, and that captions don’t take up too much space on the screen. Additionally ensure your captions comply with legal guidelines.*
- After the last line of text in the sequence, press enter twice. Always leave a blank line to indicate a new caption sequence
- After the blank line, type the number 2 to indicate the beginning of the second caption sequence and type your captions following SRT format.
- Repeat these steps until you have a completed transcript!
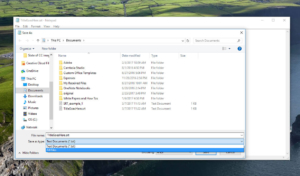
- Then click File → Save. Under File Name, type the name of your file and include .srt at the end
- Under Save as type select All Files
- Click Save, and congratulations! You are now ready to upload your captions.
How to upload SRT files
The process of uploading your newly created SRT file may vary depending on which media player, lecture capture software, or video recording software you choose to upload your video to – that’s why we’ve written how-to guides for just about every platform you can think of, including YouTube, Canvas, and Zoom.
Read the Guide: How to Create SRT Files 💬
*For more information on legal requirements and closed captioning guidelines, refer to our white papers:
Captioning laws & compliance
For online video previously aired on television:
- Are You Compliant? FCC Updates for Closed Captioning
- CVAA Online Video Captioning Requirements and Deadlines
For all federal government and federally subsidies entities who create online video:
DIY SRT Creation vs. professional captioning
SRT file creation is an easy (and free) solution to independently create captions on your own videos. However, those looking for DIY solutions should be aware that caption creation often additionally requires timecode creation, which typically makes the captioning process more time consuming.
To avoid the requirement of setting your own timecodes, YouTube’s captioning tool is one alternative that automatically syncs captions with what is being spoken in the video. Using this tool, users can select a video from their YouTube account, manually add captions to that file, and the corresponding timecodes will automatically populate. This effectively eliminates the need to manually enter timecodes (unlike in SRT file creation) and can save DIY captioners some time.
The length of time it takes to caption a video can vary, but largely depends on the length of the video itself, the captioner’s level of experience, and video quality. Typically, it could take an experienced transcriptionist 5-10 times a video’s length to transcribe captions – this means a five-minute video could take anywhere from 25 to 50 minutes to complete! If you’re creating your own captions and timecodes using an SRT file, it may take longer.
There are numerous benefits to captioning your videos, so don’t let the time it takes to create captions prevent you from adding them to your video! Captioned video content has the ability to improve your SEO rankings and serve your content to new audiences – including viewers who are deaf or hard of hearing, those who know English as a second language, and even those who simply prefer using captions.
Creating your own captions can be a cost-saver, but if you’re planning on captioning many videos or lengthy videos, consider hiring a captioning service. A full-service captioning solution ensures all of your captions are legally compliant and avoids the need to consider timecode creation in the captioning process.
A good captioning service will take care of all the logistics for you. That’s why 3Play Media guarantees turnaround based on your schedule, and a 99.6% average accuracy rate. Before selecting a vendor, it’s important to research who exactly will be captioning your videos as well as how the captioning and transcription process works, to better understand their rates.
Think you’re ready to start writing SRT captions? Get started today ⤵️

This post was originally published on March 8, 2017 by Sofia Enamorado & has since been updated for accuracy, freshness, and clarity.